Showing posts with label wooden canoe restoration. Show all posts

Thursday, 26 December 2013

Chestnut Cruiser


A while back, I wrote briefly about a 16' Chestnut Cruiser slated for restoration. This model of paddling canoe is one of my favorites. I finished the restoration of this cruiser in the early summer of 2013 and had a chance to take it out for a test paddle one early morning. What a treat this canoe is to paddle! 


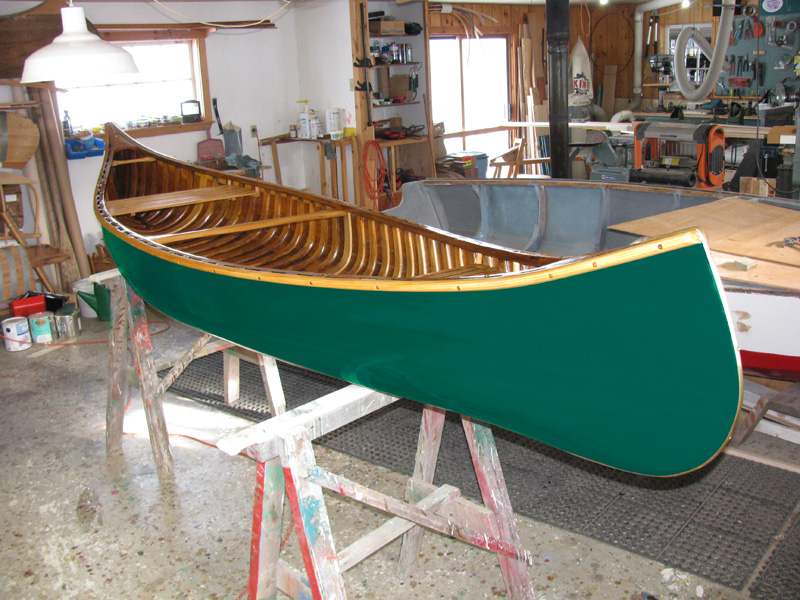
Chestnut Cruiser the 16' Kruger model, after restoration.

The initial offering in the Chestnut Canoe Company's first catalog from 1905 wasn't large. The company offered only three models; the pleasure model, the cruiser model and the guide special model. Each of them in three lengths; 16 ft., 17 ft. and 18 ft. 


The Cruiser and Guide Special were always built on the same form. In the early years both models had a flat bottom, very slim bow and stern and high ends. In the mid 1910's the building form changed to produce a rounder bottom and changed again after the devastating fire in 1921. 

                             Restoration of the Chestnut Cruiser


The customer did not know who had built it or when, only that the canoe had been around their cottage for a very long time and had spent at least the last 10 years on the ground under the cottage. After cleaning off the worst of the accumulated grime, I found a faint outline and a small remnant of a Chestnut Canoe Co. decal on the bow deck. The canoe's measurements, the very narrow decks and the slightly rounded hull bottom definitely identified it as a Chestnut Cruiser the Kruger model. 

Initially I estimated the building date to be mid 1950's. However, a closer look showed a number of building details that point to an earlier building date of 1930's or perhaps even earlier. The canoe has no serial number, it has vertical grain planking and ribs, seats were bolted directly to the gunnels without the use of spacers, the thwarts have the typical earlier well rounded shape with tapered ends, and the decks are slightly crowned and nicely undercut.


Charlie chem. stripping the Chestnut Cruiser

This canoe had been worked on several times before. There was signs that the bow and stern height had been cut down a tad. The canoe's last canvas covering, was a Verolite canvas, and oh man what a mess and stink when I started to remove the covering. There was hardly any canvas left, just the outer vinyl skin, the rest mildewed and rotted away. When last re-canvased the hull exterior had also been made smooth with the help of drywall mud. It came off in large chunks. The hull interior was chemically stripped of its varnish and washed with several applications of bleach to remove most of the black stains.

16' Chestnut Cruiser the "Kruger" model 
 Chestnut Cruiser with the damaged and rotted planking removed 

The rot had spread to both inner and outer gunnels, the two top rows of planking and a good number of ribs and rib tips, resulting in the need to replace the gunnels, 9 ribs and splice in fresh wood to 18 rib tips and the stem ends.


The Chestnut Cruiser with new gunnels and planking.

With the wood work taken care of the canoe was well sanded inside and out. To blend all this new wood to the old, the interior received a wash of stain and was topped with four coats of varnish. The hull exterior was sanded smooth and treated with an application of tung oil followed by a coat of varnish.  


Chestnut Cruiser ready for new canvas

Charlie rubbing in filler


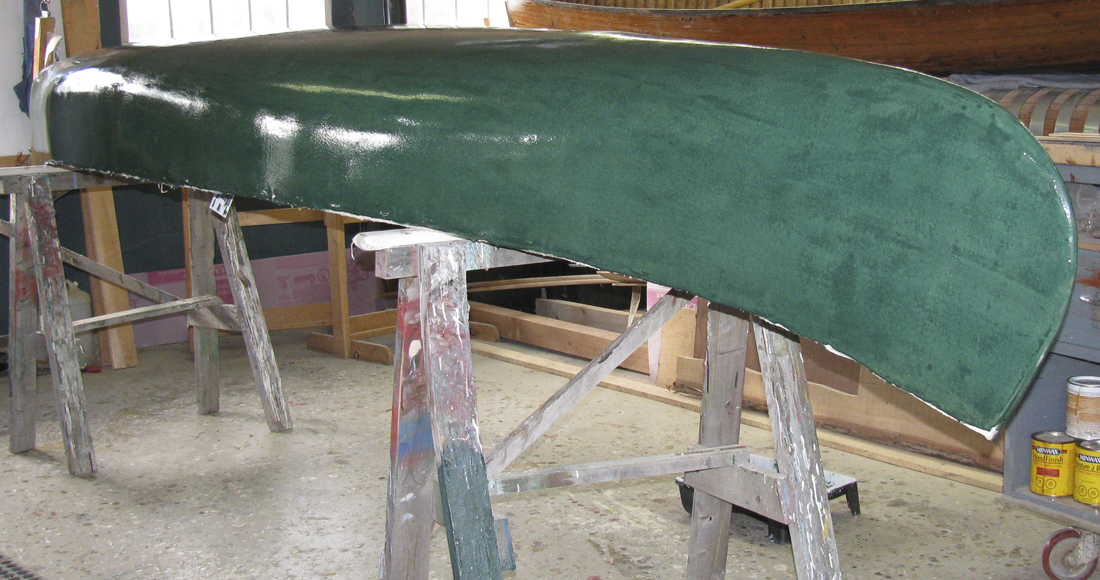
A couple of weeks later the canvas was installed. The canvas was as usual treated with a zink-naphthenate mildewcide after installation.  A smelly but absolutely necessary job if the canvas covering is going to last. Use of respirator and gloves is essential, and leaving the canoe outside to dry. You don't want to breathe in the fumes from it. In the old times of lead based fillers this step wasn't necessary as the lead in the filler was a very effective mildewcide. 


Chestnut Cruiser 16 ft. Kruger model.
  
The filler needed only a light sanding to prepare it for painting. Three coats of a fire red marine enamel was applied with light sanding between coats. When the paint was dry the outside gunnels were installed. The seats had long ago lost its caning and the framework was severely cracked, so new seats were made patterned from the old ones. 


Wednesday, 30 May 2012

A classic - Old Town Charles River wood canvas canoe


1912 Old Town Charles River wood canvas canoe

100 years ago, in January of 1912, this classic wood canvas canoe took shape in the factory of Old Town Canoe Co in Old Town, Maine. In mid April the same year it was wrapped in oiled paper and burlap with hay for cushioning and taken to the railyards for shipment to Goodwins Limited, a well-known mail-order and department store at the time, in Montreal, Quebec. The canoe was purchased that spring by my customer's grandfather and has stayed within the family ever since. 


Old Town Charles River canoe.
The canoe had suffered the usual discolorations, blemishes and scars which come from long use and old age. At some time an excited hunter had "accidently" shot the canoe not once but twice. One must wonder what the canoe had been mistaken for????

The canoe had had the canvas replaced sometime in the 1970's and the original seats and thwarts replaced with generic ones. After stripping the canoe of its old varnish the real condition of the hull could be observed. The hull was remarkably well preserved and true for a canoe this old. I was however surprised over the dark varnished interior. It was clear that this canoe must have been stained and then varnished at the factory.

The gunnel caps and outer gunnels were beyond repair. The inner gunnels needed repairs midships as well as at the ends. There were rot in the stems, so fresh wood needed to be spliced in at both stems. The canoe also needed five new ribs, a couple of rib-tips, about twenty feet of planking, a new keel, brass stem-bands, and of-course new seats and thwarts patterned from another early Old Town I restored a couple of years ago.


Work in progress
With the stripping of the hull interior done, I removed the decks and spliced in the new gunnel ends and stem pieces as well as repaired the breaks in the gunnels amidships. The five broken ribs and rotted rib tips were next to be replaced. About twenty feet of severely cracked planking were also replaced. The chemical stripping of the hull interior removed most of the dark stain. However, several applications of bleach, stain removers etc would not remove all staining, the wood still had a blotched appearance. I am not a fan of stained wood, but in this case I used a stain, as the canoe had had originally, to even out the blotched appearance of the wood.


New seats and thwarts                                               Restored deck

A light sanding of the interior prepared the wood for a mix of a diluted  Minwax stains called English Chestnut and Golden Oak. The result was very close to the original colour, only lighter. The interior then received four coats of varnish with the last coat cut from gloss to a satin.


Application of filler.
The hull exterior was sanded smooth and treated with tung oil followed by a coat of varnish. A couple of days later the canvas went on without a hitch. The canvas was as usual treated with a zink-naphthenate mildewcide after installation.  A smelly but absolutely necessary job if the canvas covering is going to last. Use of respirator and gloves is essential, and leaving the canoe outside to dry. You don't want to breathe in the fumes from it. In the old times of lead based fillers this step wasn't necessary as the lead in the filler was a very effective mildewcide.


Installation of gunnel caps.
The filler needed only a light sanding to prepare it for painting. Three coats of a dark green marine enamel was applied with light sanding between coats. When the paint was dry it was time to install the gunnels and gunnel caps. One would think that the thin gunnels and caps would be easy to bend without steaming, but they aren't. I prepare a piece double thickness, steam bend it and clamp it to a form. When dry I remove it from the form and split it in two on the band-saw. All the pieces are sanded, sealed and varnished before installation, a final coat is given after installation. The painted hull exterior easily get scuffed and scratched when the gunnels are installed. I like to apply the final coat of paint after the outside gunnels, that also gives me the opportunity to seal the seam between canvas and gunnel with paint .


Old Town Charles River awaiting pick-up


The 1912 Old Town Charles River was completed in late November and has been in storage awaiting spring and the customers pick-up of it. Now that spring is here I have taken it out of storage given it a dusting and made sure it is ready for its second century of service.


Friday, 16 March 2012

Northland Canoe V-stern


Northland Square stern canoe.
The Northland Square stern canoe is completed, at least my portion of the work. Now the owner will finish her; sand and refinish the interior as well as rebuild the seats.

Northland Square stern canoe. 


Tuesday, 21 February 2012

Northland Canoe 14 ft. V-stern


I am presently working on a Northland V-stern canvas covered canoe, a model you don’t see that often. This is the first of their V-stern canoes for me, although I have restored many Northland canoes over the years.

Northland Canoe deck with decal.

The company started out sometime in the mid 1940’s just north of Huntsville. The present owner, Albert Maw, started with the company in 1956 as an employee and purchased the company in 1964. At one time the company produced up to 200 canoes a year with a lineup of eight different models.  A fire destroyed the company and its assets in 1995. Northland Canoes is still in business, although today only as a one man shop doing mostly repairs.
This Northland square-stern canoe was covered in a #10 canvas and filled with a polyester resin. A practise the company started in the 1960’s; later the canvas covering was replaced with fiberglass cloth on all their canoe models. A polyester resin was also brushed on the interior woodwork substituting varnish.

Removal of canvas glued to the hull.

Sanding to make the hull smooth enough for the new canvas.
The canvas was well glued to the hull especially on its sides. So, I knew I was in for many hours of unpleasant work with a heat gun and putty knife, followed by a lot of sanding to make the hull exterior smooth enough for the new canvas covering.
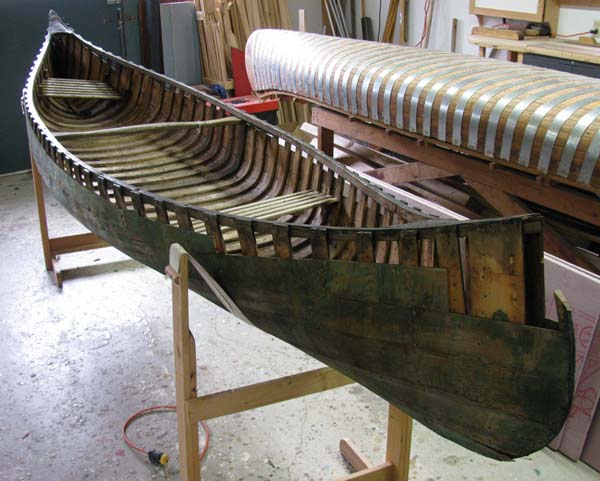
The canoe was planked with white cedar, mostly flat sawn. As is common, with canoes planked with flat sawn planking there is a fair amount of buckled planking which need work, especially as the distance between planking tacks on this canoe was too great. I have replaced the planking with the worst buckling and cracking, in some areas re-nailing and adding extra tacks was sufficient to flatten out the buckled plank. When all tacks were well clinched and secure I carefully sanded the hull followed by an oiling of the hull exterior with a mixture of linseed oil and turpentine.


Stretching and stapling the canvas. 

View of v-stern with new canvas.

The canoe’s owner wanted to watch and help out with the re-canvas work, so that morning I had two extra hands which finished the work on record time. On a v-stern like this the canvas is folded around the transom and fastened down in bedding compound. The stern is then covered by a fitted trim piece, in this case made from cherry.


Application of mildewcide to the canvas.

Warmer weather and some sun the next day gave me the opportunity to move outside to apply a zinc-naphthenate mildewcide to the canvas covering. A smelly but absolutely necessary job if the canvas covering is going to last. Use of respirator and gloves is essential, and leaving the canoe outside to dry. You don’t want to breathe in the fumes from it. I apply the mildewcide with a foam brush and stop 4 or 5 inches short of reaching the sheer, the mildewcide will migrate down. 

In the old times of lead based canvas fillers this step wasn’t necessary as the lead in the filler was a very effective mildewcide.

Zinc naphthenate preservative.

A word of advice; If you are restoring or having your canoe restored don’t skip this step! Apply mildewcide to the canvas or purchase canvas which is pretreated with it. It is also a good idea to ad mildewcide to the filler, I do both. Without mildewcide treatment your canvas covering might not last more than a few years. 


Sunday, 5 February 2012

16' Chestnut Cruiser


A couple of months ago I wrote briefly about the 16’ Chestnut cruiser slated for restoration over the winter.

Chestnut Cruiser with Verolite  canvas covering.


Bow deck with a faint trace of  an
outline of a Chestnut decal.
I brought it into the shop a couple of weeks ago. There
was no serial number stamped into the stem, but I found
a faint outline and a small remnant of a Chestnut decal
on the bow deck. It's measurement; 16’ x 33 ¾” x 11¾”
the very narrow decks and the slightly rounded hull
bottom definitely identify it as a Chestnut cruiser the
“Kruger” model. I estimated the build date to be mid to
late 1950’s.

A number of building details, however, point to an earlier
building date, most likely in the 1930’s or perhaps even
earlier. Almost all the planking is slash cut (vertical grain
angled about 30 degrees) and so are most of the ribs,
seats are bolted directly to the gunnels, the thwarts have
the typical earlier well rounded shape with tapered ends, and the decks are slightly crowned and nicely undercut.  There are also signs that the bow and stern height have been cut down slightly, which indicates that it once had the early higher cruiser ends.


16' Chestnut Cruiser the "Kruger" model.

I have removed the last pieces of the Verolite canvas, the outside gunnels, the keel and almost two rows of the cheer planking. All of it more or less rotted away. The rot has spread to a good number of rib tips resulting in that at least 45 ribs need new ends scarphed in and three ribs need to be completely replaced. The hull interior needs a complete stripping of the varnish, which means I will have to wait for warmer weather as I don’t like to perform this work inside. More about this canoe later in the spring.

Monday, 16 January 2012

Burleigh Falls cedar-strip canoe


The Burleigh Falls cedar-strip canoe is now almost finished. Installation of two new brass stembands and painter rings and this cedarstrip is out the doors.

Fresh varnish, almost done.
The canoe looks pretty good now, compared to the badly weathered and stained wreck I started out with. It now has new gunnels, deck coamings, king-planks, keel and brass stembands. It was hard work to remove those old gunnels, fastened as they were with one-hundred and fifty steel nails and twenty steel screws.

Before

Stern with fresh varnish.

Wednesday, 28 December 2011

Peterborough Muskrat


Just in time for Christmas, I was able to finish the Peterborough Muskrat. Actually, I sneaked out late Christmas Eve to install the new brass stembands. The old clunky and partly rotted outwales were replaced with a new set of Peterborough style D-shape white ash outwales. I am very pleased with the result and I hope the customer will feel the same when he sees it.


The quarter thwarts are not original, but a great add-on, handy when lifting the canoe and helps keep the ends together. I also installed a new Peterborough deck decal on the bow deck.


Saturday, 17 December 2011

Repair progress on the Peterborough Muskrat and Burleigh Falls canoes.


Where did the time go, it's more than three weeks since my last post? Well I've been busy.

Coamings, decks and king planks

The Burleigh Falls cedar-strip received two more coats of tungoil, repair and clean-up of the cedar decks and I made two new deck coamings as well as king-planks.

The Peterborough "Muskrat" has progressed well.

Oiled and varnished

Canvassed

Rubbing out filler

It is now dressed in new canvas, filled with quick drying soy-oil/silica filler.

Two coats of primer

I've primed it twice, the last primer coat coloured green. It got a couple of new ribs, a few minor backside rib repairs, about 50 ft. of new planking, stem repairs to both ends as well as repairs to the inside gunneltips. I also made a new bow slat-seat and repaired the stern seat.

Sunday, 27 November 2011

Stripping out the varnish of the Burleigh Falls cedar-strip


Since the last posting, the weather has been cooperative, so I was able to strip out the varnish of the Peterborough Muskrat,


as well as both the interior and exterior of the Burleigh Falls cedar-strip.


The gray and weathered exterior did not need a lot of stripper, but the result left a lot to be desired. Several applications of bleach and two part cleaners removed most of the staining. I am letting the hull dry for only a day after the many applications of rinsing water. The swelling of the planking raises the wood around the nail-heads which are otherwise too close to the surface for any useful sanding of the hull exterior. Now I am able to get in a couple of hours of very careful sanding with 180 grit, knocking off the fuzz and raised grain.


Yesterday, I applied a couple of applications of hot 100% pure Tung Oil. The change this imparts never stops to amaze me; a warm amber cedar colour comes forward and the hot oil also swells shut much of the gaps between the planking. I apply oil until the dry planking can't absorb any more, followed by a rubbing down of the surface to remove any excess oil.

Monday, 14 November 2011

Rib removal on the 14' Peterborough Muskrat canoe


Old Town Charles River

While the paint is drying on this Old Town Charles River, the time has come to bring in the 14' Peterborough Muskrat  to the shop.

Peterborough Muskrat

I removed the old fiber glass covering and the damaged top row of planking a couple of weeks ago. There are three broken ribs to replace and a lot of split and buckled planking. The planking issues are definitively due to that the canoe had been fiber glassed the last time it was repaired.


There are several methods to remove a damaged rib. As I don't want to damage any good planking which is easy to do when prying out the old clinched tacks, the method I am using here is as follows: I first make a series of cuts with a utility knife along the length of the rib.


It is now quite easy to break apart the rib.


When all the wood is removed  cut off the tacks and push out the remainder of the tack.


The rib is removed without any damage to the planking.